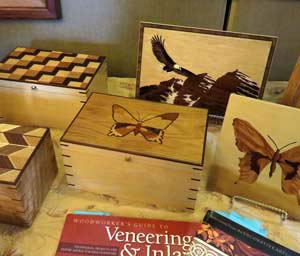
This display by the Rocky Mountain Marquetry Guild at the 2015 Gathering of the Guilds inspired a personal exploration of the art.
On a Sunday early in August, I found myself wandering through the doors of Loveland’s Woodcraft store for the first time. Usually when I’m wandering somewhere for the first time on a Sunday in summer, I’m scouting for artisans at a festival I haven’t attended before. On this particular Sunday, however, I was doing something I almost never do – getting my hands into a craft to see what it’s like.
Marquetry had caught my eye at the Gathering of the Guilds in April. I have always loved what I thought of as inlaid wood designs. I didn’t know the word marquetry until I studied the display of the Rocky Mountain Marquetry Guild. And I didn’t know what it really meant until I tried the craft myself.
Embarking on an Adventure in Wood
As I walked through the Woodcraft store, I gawked at materials and tools I’d never seen before. I thought about how my husband had raised his eyebrows slightly when I told him about the adventure I was undertaking. He pointed out that I had never done woodworking before. I admitted that I never had. He suggested that I might need gloves and safety glasses. Well, I thought when I arrived at Woodcraft’s classroom door, if I needed anything I could certainly get it right here.
As it turned out, I didn’t need a thing. Least of all gloves and safety glasses.
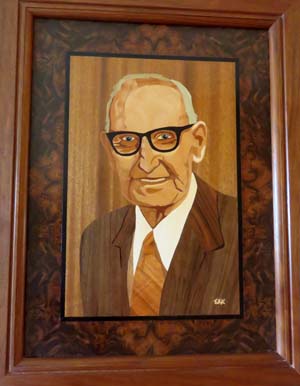
Artist Ellen Kisker applied her marquetry skills to create this portrait out of a variety of wood veneers. Ellen collaborates with husband Dave in WildView Studio.
I spent the next six hours with one other student (Bob) and our instructor Dave Kisker. Dave had a container of supplies for each of us, plus a variety of wood veneers and design patterns to choose from.
Marquetry, I soon learned, involves cutting thin wood veneers of different colors and assembling them to create a design or picture. Instead of being laid into a larger piece of wood, the design is glued over the top in one complete, continuous surface edge to edge.
For example, a piece of particle board supports the portrait Dave’s wife Ellen made of his grandfather. The narrow dark border and the mottled mat are veneers that Ellen included. Running your hand across the entire surface, you wouldn’t notice where the mat ends and the picture begins.
For the class Dave had wisely selected small, simple drawings – projects which beginners could conceivably complete in a day but which lend themselves to artistic interpretation. They reminded me of the cartoons David Johnson uses to build his tapestries.
That day I browsed through more colors and grains of natural wood than I could have imagined. I heard names of trees that I had never heard before, too. Dave explained that since the veneers are only 1/42 of an inch thick, it’s possible to use exotic woods that would be very expensive in a board.

A simple paper pattern makes a good first project in marquetry. The color of each section and the order in which it is cut are matters of personal judgment, noted in a code of numbers and letters.
I selected a rose design and chose three shades of yellow veneer for the rose petals. Two shades of brown would form the rest.
What I had learned from Barbara Beasley about making art quilts and from Anne Meier-Davis about constructing stained glass helped with the next step — making a plan for color and cutting order.
Dave advised me to figure out which part should be farthest away in the picture and to cut that piece first, then work my way forward. The order I marked on the pattern in numbers. The stem, number 10, would be last. I assigned each yellow veneer a letter code and noted it accordingly on each petal segment. Thanks to Barbara and Anne, the process seemed familiar.
Bob and I applied rubber cement liberally to the back of our patterns. We then positioned them over our background veneers and pressed them in place.
Making the Cut
Scroll saws, fret saws, x-acto knives — any one of these can be used in excellent marquetry. The problem, Dave told us, is how long it takes to acquire the necessary skill.
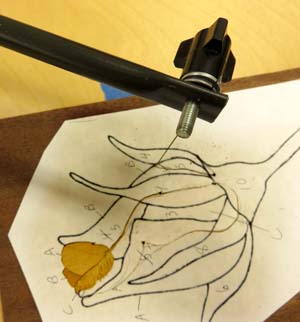
A manual scroll saw cuts at an angle through two pieces of veneer, minimizing gaps between pieces when assembled. John Eifler developed the saw especially for marquetry.
Dave himself gave up on marquetry in the 1990s because he couldn’t master the technique associated with an x-acto knife. Finally in 2004 John Eifler, a former member of Rocky Mountain Marquetry Guild, introduced Dave to the manual scroll saw he had developed. The manual scroll saw cuts through veneer at a consistent angle, making it possible to use a simpler marquetry technique. Dave was hooked and so was Ellen.
Cutting at an angle through a thickness of 1/42″ doesn’t sound as if it could matter. Yet, it’s the secret to eliminating gaps between pieces. Dave makes the saw that hooked him on marquetry not only for his classes but also for anyone serious enough about the craft to purchase one.
Bob and I each had a manual scroll saw to work with in class. Explaining the entire cutting and assembly process is beyond the scope of this blog; however, I can share highlights.

Beginners complete marquetry projects like this under the tutelage of Dave Kisker.
We were always cutting two veneers simultaneously — the shape that we needed and the hole where we needed it to go. To get started, we drilled a tiny hole through the two veneers with a simple handheld drill Dave had made.
Next we needed to thread the blade up through the hole and attach it to the top of the saw. Bob and I threaded plenty of blades that day because we kept breaking them. We were, after all, beginners.
Dave was the epitome of patience and kept supplying us with new blades. The teeth on the blades were so fine, we could run our fingers along them without cutting ourselves. With Dave’s guidance we slowly caught on to sawing with the rhythm and speed that would minimize blade destruction.
When we completed a cut, we glued the piece we had just formed into the hole we had just created. By the end of the day I had assembled the picture of a rose that you see above.
Completing the Picture
To complete our projects, we still needed to fill in gaps with a mixture of glue and sanding dust, glue our work to a piece of particle board, and sand it to a completely smooth surface. Finally, a layer of shellac would seal it, and a few layers of wipe-on polyurethane gel would protect it and enhance the color.
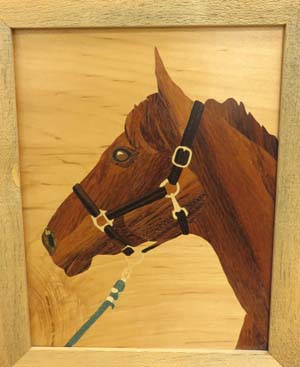
An avid artist in marquetry, Ellen Kisker chose veneers with grain that enhance this horse’s coat and create the illusion of its breath.
How did we manage it when the class lasted one day? Bob planned to go to one of the workshops which the Rocky Mountain Marquetry Guild sponsors twice a month, free to anyone interested in learning the craft. Beginners have access to supplies, saws, and the help of experienced members on any projects they’re tackling.
To facilitate my preparation of this blog, Dave invited me to complete my project at his home on the outskirts of Loveland. There I chatted with Dave’s wife Ellen, who has a background in art. She and Dave, who has a background in woodworking, make an effective marquetry team. Ellen provides artistic consultation, and Dave solves the technical problems.
Dave and Ellen took over leadership of the guild’s workshops several years ago, when their own mentor John Eifler withdrew. They’re committed to giving others the opportunity to try the art as a way of “paying forward” what they had received.
They post their own work, often commissioned pieces, on Facebook as WildView Studios.